Monday, July 30, 2018

Top 5 Best Free Backup Tools For Mac 2018


Top 5 Best Free Backup Tools For Mac
Best Free Backup Tools For Mac
1.Time Machine


Lets start the list with Time Machine, the macOS very own backup program. I have been using Time Machine since a couple of years and the feature has served me well. All you need to do is plug in a portable hard disk and configure the time machine to backup your data periodically. That being said Time Machine lacks advanced options and offers a very basic user interface. If you are a home user and are looking out for a basic backup tool the Time Machine should serve you well, else read on.
2.FreeFileSync


FreeFileSync fills in the void and offers all the advanced features that the time Machine misses out on. The file explorer interface can be used to sync contents accross two sources. The best part is that the FreeFileSync offers a good degree of control to the users when it comes to the specific files/folders that ought to be synced. With the two-way syncronisation you can make sure that both the folders are up to date and also handle the conflicts/duplication of files.

Download Freefilesync here
3.Super Duper


We have all heard of disk-cloning applications. Disk cloning is often referred to the process wherein your startup disk is backed up. In other words with this feature you can backup your entire operating system along with the user settings. The free tier of the Super Duper lets you backup and restore full disks but doesn’t allow users to schedule the process. If you want to have those advanced features you need to chip in and go for the premium tier.

Download SuperDuper here
4.CrashPlan


Untill now we have mostly talked about local file backup. However, it is also preferred to backup data on cloud drives. CrashPlan offers you free local cloud storage and allows yout backup Mac computers by creating your own local cloud. If you are wary of trusting cloud servers you can also backup your computer on off-site locations like your office servers. The free version of CrashPlan is pretty comprehensive and offers the ability to schedule backups, create off side backups and backup external drives.

Download CrashPlan here
5.iBackup


iBackup relies on a user interface that mostly resembles the macOS file explorer. The program allows you to select and backup single files/folders from your home directory. Additionally iBackup also allows you to backup system preferences and settings. Most importantly the iBackup is very efficient when it comes to backing up your Mac.

Download iBackup here
Conclusion

The world of free backup is less populated than it once was. However, two core applications, Time Machine and SuperDuper, can work together to create an excellent backup system that will protect you from many kinds of data loss. Just add a cloud backup service like Backblaze or Carbonite. Then you’ll have a robust backup system to keep your Mac’s files safe.

iPhone backup extractor :The best iPhone Backup Extractor software to extract photos, text messages, contacts, voice memos, note, WhatsApp, Viber and etc from iPhone/iPad backup
Image result for gihosoft iphone
Gihosoft Free iPhone Data Recovery is a professional iPhone Data Recovery software to get back all your lost text message, photo, video, call history, note, contact and more from iPhone/iPad/iPod Touch. It offers a full solution to recover your lost data in different tough situations. Besides recovering data directly from iPhone, iPad and iPod touch, it also allows you to recover data from iCloud and iTunes backup files.


Thursday, July 26, 2018

Top 10 Best Photo Editor Apps For Android Phone 2018-2019

Top 10 Best Photo Editor Apps For Android Phone 2018-2019

Top 10 Best Photo Editor Apps For Android Phone

Top 10 Best Photo Editor Apps

Well, many of the Photos Editor is available in the Apps market. But some are good and some are not so good, so I have listed some most popular photo editor apps here.


1.Bonfire Photo Editor Pro [Price: Free with in-app purchases]


Bonfire Photo Editor is an editor app that is becoming more and more popular every day on a daily basis. There are some fun features in it too. It has all the basic filters and basic editing tools. What makes Bonfire different is that it supports too many filters. Some of these are common filters like black and white, HDR, etc. But apart from this, there are some unique filters, such as Fancy, a filter that converts your photos into watercolour. There are also basic editing tools, like skin smoothing and blemish removal! If you want to try it, you can download Bonfire Photo Editor Pro best picture editing app for Android from the link below.

Download Now

2. Adobe Photoshop Lightroom and Adobe Photoshop Express [Price: Free / Free with in-app purchases]


Adobe has made great improvements in its photo editing tools last year, and create leading photo editing apps such as Lightroom and Photoshop Express. With Lightroom, you can adjustments in your photos only in one click, and in Photoshop Express you can use basic features such as filters, crop, auto-fix function. Both of these apps are great for photography.

To download them, click on the link below.

Download Now
3.AirBrush [Price: Free]


AirBrush is a very good photo editing app for you if you take many selfies. In this, you can use many faces and skin editing features such as blemish remover, whitening teeth, eyes brighter, reshaping tools, and many more filters. It's easy to use, and it has also got 4.8 ratings in the Google Play Store, which is a great achievement. If you want to try it, you can download it from the link provided below.

Download Now
4.Cupslice [Price: Free]


Cupslice is a photo editor that distributes filters to give a good experience. There are thousands of stickers in this app's features and developers are trying to keep stickers always up to date. You can also customize filters according to your needs. There are some basic photo editing tools such as crop, frames, hue and saturation adjustment, black and white, collages, and brightness and contrast settings.


If you want to try it, you can download it from the link provided below.

Download Now


How to remove your name and number from Truecaller


Top 10 Best Websites to Download free/paid Software for PC/Laptop


5.Fotor Photo Editor [Price: Free with in-app purchases]


Fotor has been in the top editor apps list for the very long time. This is an app that you must definitely try. It has many editing features, which are not in other apps. There are features of one-touch enhancement for your convenience. In addition, crop, rotate, brightness, contrast, saturation, exposure etc. in it. There are also features like. In this, you also get the facility to create a collage. If you want to try it, you can download it from the link provided below.[Top 10 Best Photo Editor Apps for Android Phone]

Download Now
6.Photo Editor by Aviary [Price: Free with in-app purchases]


Photo Editor by Aviary has been a popular photo editor since very long time, which offers many features, and is also reliable. In this, you will get the convenience of one-touch to enhance mode. Along with this, you will also find a variety of manual adjustments in it, so that you can adjust colour, brightness, temperature, contrast, saturation, etc. In it, you will also find stickers, filters, and cosmetic tools such as red-eye fixing, blemish remover, and teeth whitener. If you want to try it, you can download it from the link provided below.

Download Now


7.Photo Editor Pro [Price: Free]


Photo Editor Pro is a very popular photo editing tool and it has been downloaded more than 50 million times and has received more than 10 million reviews. This is a great mix of "modern filter editor" and a regular editor. In it, you will find many basic features like sharpening and blur modes, temperature control, saturation, hue, contrast, and brightness controls. In it, you can use stickers, frames, filters etc. Will also meet. If you want to try it, you can download it from the link provided below.

Download Now
8.Photo Effects Pro [Price: Free]


Photo Effects Pro is a great photo editing app, especially for those who like filters and effects. Apart from this, there are also stickers and other features. Photo Effects Pro has a feature called finger paint, which makes it the most different. In this case, even if photo editing tools are not much, but due to its effects, you definitely will use it. If you want to try it, you can download it from the link provided below.

Download Now
9.Photo Lab Pro [Price: Free / $ 2.99]


Photo Lab Pro has not yet become as popular Photo Editor Apps, but it has all the best features. It has 640 filters, frames, and effects, which are much more than any other app. With the help of this app, you can create montages, lightly edit photos, unique photos and share them with your friends. It has a free version, but it will be advertising and watermarks. If you want to try it, you can download it from the link below.

Download Now
10.PicsArt Photo Studio [Price: Free with in-app purchases]


PicsArt has been one of the top Photo Editor apps for a very long time. It has so far downloaded 250 million people. Its developers update it every month, due to which it has all the modern features. In it, you will find all the basic features as well as light editing tools and also get the convenience of filters, text, stickers, and collages.

Download Now


Friends if you liked this post on Top 10 Best Photo Editor Apps for Android Phone then share it with your friends too. And if you want to ask us anything about this, you can ask in the comment box below. And subscribe to our Blog's Notification so that we can get you the latest post as soon as possible.


Bonus Tips:

If you find your secret photos, videos or files are lost from your Android phone, you may try these Top 5 Best Android Data Recovery tools to help you get back the deleted data from Android internal memory.


How to Speed Up an Old Android Device


How to Speed Up an Old Android Device


Speed Up an Old Android Device

Manually Remove Files and Apps With DiskUsage


DiskUsage runs a quick analysis on your tablet or phone’s storage drive and visualizes how much space remains. It also shows what files are taking up the most amount of space. I use the app to identify what media files (like music, photos, or apps) are taking up the most amount of space—and then I delete those files to speed up my phone.


Do not use DiskUsage on any system storage drive. To delete a file using DiskUsage, open the visual depiction of your files and tap on the three dots in the upper-right corner of the screen. From the context menu, choose Delete.
2. Finding and Killing Misbehaving Apps


Android’s design allows for apps to run in the background without consuming processing power. In theory, a well-designed application only uses resources for brief periods of time. Unfortunately, poorly designed apps call on operating system services that can drain batteries and slow performance.


The solution is to find those misbehaving apps and remove them. Unfortunately, Google doesn’t make it obvious. Here are a few tips on how to find potentially bad apps.
Identify Auto-Starting Apps on Android 5.x and Newer


The simplest way to identify possible bad apps is by looking at their permissions.


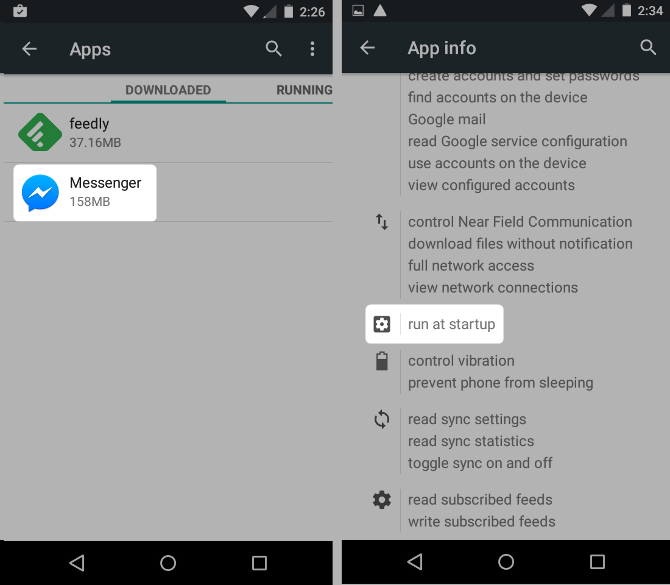
A quick primer on permissions: apps must request permission to use sensitive parts of your phone. For example, an SMS application needs to request the permission to send and receive text messages. If it wants to run all the time, it requires a permission called run at startup.


Unfortunately, Google doesn’t make it clear which apps run at startup.


To find it on Android versions 5 through 7, navigate to Settings > Apps. On Android 8 Oreo, you’ll find this at Settings > Apps & notifications > See all X apps. Here, tap on a non-system app that you suspect of causing problems. Then tap on Permissions.


From the Permissions menu, scroll down and scan through each permission. If you don’t see the entry for run at startup, then the app doesn’t run as soon as you boot your phone.


Unfortunately, you cannot disable this permission on most Android devices. While many autostarting apps are well-behaved, a number of them are not. However, in general, the fewer apps that autostart, the better.


Remember that a third-party ROM can grant access to features not found in normal Android versions. So if you’ve got an older device, you may want to consider a custom ROM.
Identify Auto-Starting Apps on Android 4.x


For Ice Cream Sandwich through KitKat devices, you can find autostarting apps by restarting (hold the power button down until you see the power off or restart options) and then heading to Settings > Apps. Here, swipe from the right side of the screen to the left side to open the Running tab.


These are the apps that start with your device and run continuously in the background. Some of these are system applications, meaning they perform some function that is essential to Android’s operation. The others are apps that you’ve installed that are always in memory and sometimes consuming processing resources.
Identify Auto-Starting Apps With Startup Manager


Fortunately, there’s an app for this as well. Startup Manager allows you to identify and eliminate apps that automatically start along with your phone—without costing a dime.


The app is simple to use. After installing and opening the app, you’ll see all the apps that automatically start along with your device. If you spot an application that you do not need, you can remove or disable the app by long-pressing (touching and holding) until a context menu appears.


We don’t recommend keeping any app that you do not use—even if it doesn’t autostart. And we certainly don’t recommend keeping Startup Manager on your device. The developer has abandoned it, and it has too many advertisements.


A word of caution: if you use Startup Manager to disable system apps, you will have to factory reset your phone to get it working again. System apps are critical to the function of your phone and should never be disabled unless you know what you’re doing.


Note: Startup Manager was rolled into a larger toolkit of Android optimization apps called All-In-One Toolbox. You can do the same thing with fewer bugs on that version. However, it may not support older phones. And it has far too many advertisements for me to recommend installing it.
Turn On Manual Sync for Apps


After eliminating all non-essential applications, you need to turn on manual sync for each remaining app so it doesn’t update all the time. If you absolutely need push notifications for an app, feel free to leave notifications on—but keep in mind that the effect of dozens of apps with sync turned on is cumulative.


Newer hardware may not even blink at tremendous amounts of apps constantly updating. Older hardware may choke on it.
3. Optimizing Your Device


Some of the optimization tips in this tutorial require enabling Developer Options (see below). The rest only require a few simple actions to initiate.
Trim and Optimize Your Storage Drive


This method only works for Android 4.3 and newer.


Unfortunately, even after killing the clutter, Android may still feel sluggish. That’s because of the way flash storage works. Solid state memory doesn’t automatically optimize itself immediately after freeing up space on your device.


For Android version 4.3 and newer, a process called trim needs to run before the storage starts behaving normally again. Trim works best when you have at least 25 percent free space. And you may want to leave the phone charging overnight in order for trim to run uninterrupted.


To optimize the storage on your device:


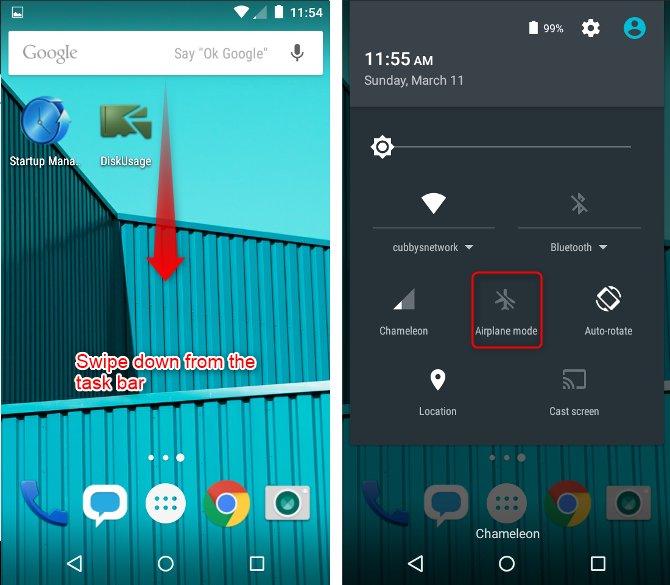
Make sure you have at least 25 percent free space on your phone or tablet.


Put the phone in Airplane Mode by swiping down from the notifications tray and tapping on the airplane icon.


Plug it into a power source and leave it charging overnight—24 hours for the best results.
External Storage


If your Android device includes a microSD card slot, it’s possible to enable write-caching and move apps to the card. Unfortunately, most microSD cards are pretty slow and can contribute to poorer performance. You actually need a Samsung Select or EVO card or an A1-rated card in order to get better performance.


Samsung 64GB 100MB/s (U3) MicroSDXC EVO Select Memory Card with Adapter (MB-ME64GA/AM) Samsung 64GB 100MB/s (U3) MicroSDXC EVO Select Memory Card with Adapter (MB-ME64GA/AM) Buy Now At Amazon $19.99
Enable Developer Options


This method only works for Android 4.4 and newer.


A handful of performance optimization tips require turning on Android’s Developer Options. Turning on Developer Options opens the door to other tricks, like disabling animations, that lead to faster app launches and more.


We’ve previously covered how to enable Android’s Developer Options. Just perform the following:


Open Settings.


Scroll down the list and choose About Phone.


Locate Build number and tap on it seven times.


You should receive a notification that you’re now a developer. From now on, you’ll see Developer Options in your Settings menu (located near the bottom).


After enabling Developer Options, head back to your Settings menu and tap on Developer Options. Within this section, there are a few features you can tweak that improve performance.
Turn Off Animations


Android automatically animates all screen transitions. So for example, whenever you open an application, an animation plays. Turning off animations improves how fast apps launch.


To turn off animations, first, open Developer Options. Scroll down the list of items and locate the entry for Drawing. Under this, you should see three kinds of animations:


Window animation scale


Transition animation scale


Animator duration scale


The animations can scale between off and 10x. Switch them off by tapping the entry and selecting off from the context menu.
Force 2D GPU Rendering


Some apps use your device’s CPU, rather than the dedicated graphics (GPU), in order to run 2D games. This can result in poorer performance. Enabling this feature can sometimes improve performance by forcing games to use the GPU (if they don’t by default).


But the tradeoff can decreased battery life, and sometimes worse stability. I’ve enabled it on a few older handsets and haven’t noticed any issues with games such as Kingdom Rush. (But I’m pretty sure that game properly uses the GPU.)


To find this, navigate to Developer Options and locate the option under the heading Enable hardware accelerated rendering. Then tap on the slider to enable it. However, not all phones include this option.
Force 4x MSAA


This tip doesn’t improve performance, but it does make games look better. If you play games on your Android device and always leave it plugged in—or don’t care about battery life—consider enabling Force 4x MSAA. The feature smoothes out jagged corners on some games. On the downside, it can decrease your battery life and the apps can sometimes (but not always) run slower.


To enable it, navigate to Developer Options. Then tap on the slider next to Force 4x MSAA to enable it.
Look at Process Stats


This method only works for Android 4.4 and newer.


Another method for finding bad apps is through looking at a feature called Process Stats. To find Process Stats, navigate to Developer Options and scroll down to Process Stats. In this section, you can look at exactly how long a process (or application) has run in the background and how much memory it consumes.


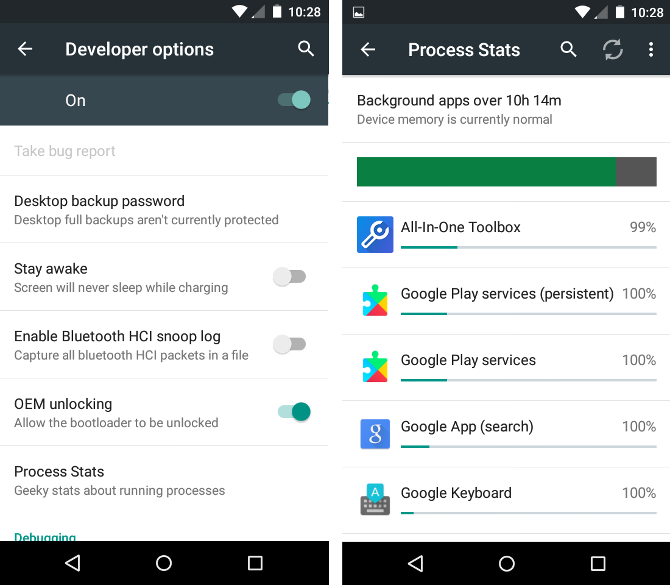
Not every app here is bad for your device’s performance. However, you might spot a few apps that you know you installed and never use. In that case, uninstall these applications.
Can You Speed Up an Old Android Phone or Tablet?


Yes! For the most part, the most powerful method for improving performance is to remove bad apps. After cleaning your device up, I also recommend putting it into airplane mode and leaving it charging overnight. And to get a little more performance, try turning off animations.


Unfortunately, even with all the right tweaks, Android doesn’t age well. And that’s the big issue with older devices: security.


Believe it or not, you really don’t need a malware scanner app. And whatever you do, certainly don’t install a task killer or RAM booster.


MakeUseOf has covered—in detail—many Android optimization tips. It’s true that most Android speed hacks are myths and don’t really improve anything. However, a few tips really do supercharge Android’s performance.


Actually, when messages are deleted, they only turns to be invisible, and then disappear completely when being overwritten. To retrieve deleted messages from Samsung phones, you don’t need to look farther than Samsung Data Recovery. It’s a professional data recovery software with high recovery rate. It can recover SMS messages and other Android data from a lot of scenarios like System crash, accidental deletion, factory reset and others.
As a professional Google Pixel data recovery freeware, Gihosoft Free Android Data Recovery can help you easily recover lost data such as photos, videos, contacts, text messages, WhatsApp & Viber chats from Google Pixel/XL or other Android phones effortlessly.
Any app suggestions or topic recommendations are appreciated in the comments down below.


Monday, July 23, 2018

How to use iMessage on PC or Laptop 2018 Tricks: Windows 10/8


How to use iMessage on PC or Laptop 2018 Tricks: Windows 10/8


Use chrome Remote desktop

Some people are worried about what a solution but some critical situation just like you have only windows Laptop with you or Desktop at the office, Your Mac desktop at home and Wants to start iMessage chat on a remote desktop. Here’s the secure connection for remote access Macbook, iMac or Other Mac devices.

Chrome remote desktop pretty cool and very nice, lightly access your macOS remotely.

Step #1: First install Chrome remote desktop Remote Message Client Extension from google on windows Google chrome browser, in not installed Google Chrome, you must have to install first.


Step #2: Click on Add to chrome and Add after that wait for the download and install chrome browser. That we can open the Browser Apps section then Click on Launch app.

Note: here you need to enter your Gmail account (Email & Password). Wait for remote desktop download; it will automatically launch on screen.
On Mac

Follow the same steps on your Mac google chrome browse, Install remote desktop and open.


Find remote desktop setup file under Mac download folder, Run and install by setup on screen step by step.

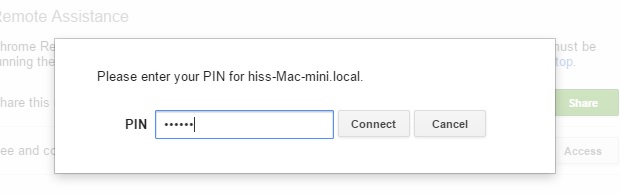
Setup security pin for personal use or permission for access screen on windows.

Now, on Windows system find your remote Mac and Click on it for start screen sharing on Windows.


Open iMessage and start chatting just like using on Mac or iPhone/ iPad.

Other less trusted and more alternate option, Techie is also using windows Android Emulator (Blue stack) or ipadian (Run iOS iMessage apps on Windows).If you lost videos from iOS Camerall Roll which are nowhere to download again, you can use Gihosoft iPhone Data Recovery to get back deleted videos from iOS device including iPhone, iPad and iPod Touch.

Jihosoft iPhone Backup Extractor Extract and recover all types of data from iPhone backup files, such as camera roll photos, videos, SMS, contacts, reminders, WhatsApp, and etc.

Gihosoft Android data recovery Free is a super awesome software specialized in Android file recovery. With this program, you are able to recover deleted photos, music, videos, messages, contacts, call logs, WhatsApp messages, Viber chat history and more from Samsung, Huawei, LG, HTC, Motorola, Google, Oneplus, Sony, Lenovo, ZTE and other Android devices directly. Meanwhile, this Android data recovery software is available for both Windows and Mac platforms.


Remove Objects From Photos With This Simple Photo Editor App [Deals Hub]

A new report from The Wall Street Journal claims that Apple ranks its own apps above others on the App Store. Apple has refuted the claims ...