How to Fix The problem “iPhone is Disabled, try again in 23614974 minutes”
The problem “iPhone is Disabled, try again in 23614974 minutes” is a common occurrence, and it’s getting iPhone users frustrated. You may be asking yourself, “how can I wait for 46 years before unlocking my iPhone, and why are my getting this notification?”
Firstly, we shall be looking at the reasons why iPhone is restricting you from accessing your files and data. Secondly, we shall be discussing ways to fix this issue.
Why Is My iPhone Disabled for 46 Years?
Here are the reasons why you are getting the notification “iPhone is Disabled, try again in 23614974 minutes”.
This notification is usually a glitch or bug in the iOS software.
You may have entered the wrong passcode too many times, causing iOS security features to delay you for too long.
A bug may have caused your iPhone time machine (clock) to malfunction or reset to default, thereby over timing your next trial.
#1. Erase iPhone via iCloud
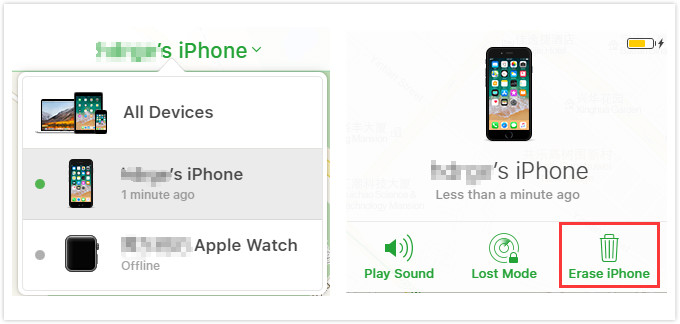
When your iPhone is disabled for 46 years, you can open it with iCloud using “Find My iPhone” feature. However, for this method to work, you must have enabled Find My iPhone before now. Your iPhone should be connected to internet as well.
Step 1. Log in to the official iCloud account using your friends Safari browser. Enter your Apple ID and password when asked to do so.
Step 2. Click “Find iPhone” and tap the “All Devices” option. iCloud will display a list of devices you’ve linked to your iCloud account. Select your iPhone to erase it.
Step 3. Choose “Erase iPhone” option, and confirm your selection. After a while, iCloud will automatically erase your iPhone, and open it.
#2. Restore iPhone with iTunes
Just like iCloud, iTunes can help you to restore your iPhone and remove the disabled notification on your lock screen. Though some users complained that the recovery mode way was not working, you can still try restore iPhone if you synced your iPhone to iTunes in the past.
Step 1. Open iTunes on your Mac or PC which you synced iPhone before.
Step 2. Connect your iPhone using a USB cable.
Step 3. Wait for iTunes to sync and back up your iPhone. (If iTunes asks for any password, this way won’t be available for you.)
Step 4. Click “Restore iPhone” on iTunes. Confirm it by clicking “Restore” to continue.
Step 5. When it’s finished, you need to set up your iPhone. When you get to the Set-UP screen, click “Restore from iTunes”.
Step 6. Select your device in iTunes and choose the most relevant backup by looking at the date and size.

You may also like:Gihosoft iPhone Data Recovery
Must Read:Gihosoft Free Android Data Recovery
Must Read:Jihosoft iTunes Backup Unlocker
Jihosoft iTunes Backup Extractor free is a powerful tool to recover and extract important data from iPhone, iPad & iPod touch backup on Windows or Mac.


No comments:
Post a Comment